I saw these
here with a link to a tutorial
here.
I HAD to make them!!!
Mine turned out like this...


(gotta love that spit up:)
...stockings too BIG and babies legs too SKINNY.
Still cute though!
I will be purchasing more tomorrow!!
I, like Ashley from makeitandloveit.blogspot.com, thought that parts of this tutorial were just a little bit confusing. So I thought I would do a tutorial of my own because like she mentioned, they are SO easy to make. Honestly, you can make a pair in 5 min.
Here goes: (warning: 1 million pictures!)

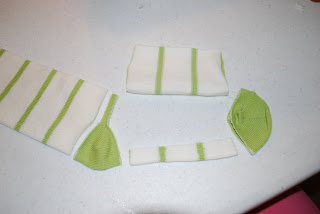
All you need is, KNEE HIGH SOCKS, SCISSORS, SEWING MACHINE and THREAD.
 Make the above 3 cuts in your socks.
 Now make your last cut as shown above. Cut more or less off the bottom to make a bigger or smaller cuff (for older or younger bebes).
 You will now take the larger piece and flip it so the right sides are together.

Take that same piece (soon to be your cuff) and close the open edge with a zig zag stitch.

Your cuff is well on it's way. Now turn the long part (leg) inside out.

Start to turn your cuff right side out... but not all the way.

Just till it is exactly in half. (folded edge towards the leg, unfinished edge toward the toe).

Simply slide the leg up so it is even with the cuff.

Move that cuff closer to the leg.

Even closer, till it is inside the leg.

In a little more.

And just a touch more so all the unfinished edges are together.

Move that same piece to the sewing machine, place your foot on three layers of fabric (2 cuff, 1 leg) and sew all the way around (line up the right edge of your presser foot with rough edges).

Since the cuff is a little smaller than the leg, you can pull on the cuff to stretch it a bit while you sew. (Don't stretch the bottom layer.)

Once you have made it all the way around, go around one more time, this time sew right on the rough edge.

This is what it will look like.

Flip out that cuff.

Now turn it right side out.

Toss those little scraps and WALAA!!!

You made BABYLEGS!!!
The blue pair were made exactly the same way, I just cut the sock a little higher above the ankle than the green sock for a shorter BABYLEG.
Let me know what you think and if you need clarification I can do that too!
** Melissa **


 To this:
 Do you like the vintage look? Then try this one...
  To this:
 Or if you just need a "little perk"


 So I did it... using just a SHARPIE... I'm serious!
 Then take a flour tortilla and spray both sides of the tortilla with PAM (or any nonstick spray) and lay on top of the tin foil balls (the tortilla will form better to the ball if it is a little warm so I microwave it for a few seconds first). Bake at 375 for about 10-15 minutes or until golden.


.JPG)
.JPG)